Post by Deleted on May 9, 2015 13:33:43 GMT
Hi everyone,
Welcome to Photoshop Elements & More and to the very first Creative Effects Challenge.
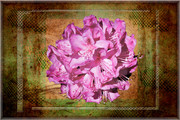
For this challenge we will be creating a grungy flower piece of digital art. I found this tutorial in a UK magazine called “Digital Photo”. I have adapted their steps slightly and so have re-written the tutorial accordingly.
Here is my starting image:
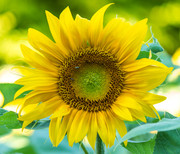
And this is what it looks like afterwards:
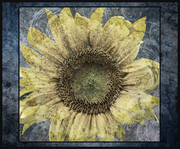
I used Photoshop Elements 13 to create the above, so if you are using an older version some of these steps may be slightly different. If you get stuck, let us know and we will try and work it out together.
1. Start by finding a nice textured background, this will become the background for the flower.
2. Next find a photo of a flower shot front on, as this works best.
3. Open both files in PSE.
4. Go to the photo bin and select the flower photo.
5. Let’s start by just selection the flower. For this select the Quick Selection tool by hitting “A” on your keyboard. Make sure the “Add to Selection” option is selected, set the brush size to about 50 pixels and check the “Auto-Enhance” option.
6. Now select the flower by “painting” it. You should see some “marching ants”, showing you what has been selected. Don’t worry if you have accidentally selected more than you wanted to; just switch to “Subtract from Selection” and move to the sections you want to remove from your selection.
7. Once you have selected your flower it is time to copy and paste it onto the textured background. With the flower selected press Ctrl + C to copy your selection and then open the background file and press Ctrl + V to paste the selection onto the background. You should now have the flower on your background; you might need to resize your flower. To do this you use the Free Transform tool by pressing Ctrl + T, grab the corner handles and resize until your flower sits central on your background.
8. Now add a Levels layer to the top of your layer stack and turn it into a Clipping Mask by setting your cursor between the Levels layer and your flower layer and then click Alt which will turn your cursor into a little box with a downwards arrow and now right click with your mouse. This should then result in the Levels layer being clipped to the flower layer underneath.
9. Repeat this step by adding a Hue/Saturation layer in the same manner, and clipping it to the Levels layer.
10. Make the Levels layer active by selection it, click on the levels and adjust the levels until the flower is much lighter. Start by using these values and see how it looks: 0, 1.54 and 255.
11. Next, select the Hue/Saturation Layer, click on the Channel drop down box, select the main colour of your flower and then play around with the sliders until you are happy with the colour. You may need to go to a few colour channels to get an effect you are happy with. I desaturated the yellow, cyan, and magenta in my photo and played around a little with the lightness slider. There is no right or wrong here, this is totally up to your personal taste.
12. Next we want to darken the edges of the flower petals. First, select the top three layers, which should be Hue/Saturation layer, Levels layer, and your flower layer. Then merge them by pressing Ctrl + E on your keyboard.
13. Now repeat step 7 to create a clipped Levels layer. Set the levels to 0, 0.63 and 255, select the Brush tool by pressing “B” on your keyboard. In the tools option section select a soft-edged brush, set the foreground colour to Black by pressing “D” on your keyboard, and depending on the size of your flower petals you might need to adjust the brush size. You are ready to paint over the ends of the petals, giving them a darker look.
14. Find a good grungy texture, open it in PSE and drag it from the photo bin onto your flower. Again, you may need to use the Free Transform tool (Ctrl +T) to ensure that this texture sits over your current creation.
15. Select the Rectangle Marquee tool (“M” on your keyboard) and draw a square selection over this texture. Now we are going to add a layer mask. Go to Layer >Layer Mask>Reveal Selection. Change the blending mode of this layer, try the different options to see which appeals to you the most, and then set the Opacity of this to around 50% (again, it is worth playing around with this).
16. Go back to your Brush tool (“B”) and select a swirly type brush, or anything else that you think will work with your colours and flower you have chosen. I went for a spikey swirl type brush. In the tools option set the brush size and “stamp” over your photo. Adjust the brush size, the brush angle and opacity to get a good variety going.
17. Once you are happy with what you have created flatten the image, crop it to suit your taste; I went for a square crop and then I added a black border.
18. You can stop here or carry on as I did by placing this creation onto another background, cropped to size and then adding one further frame.
The most important part of this tutorial is to experiment. The first texture I used didn’t really work for me, so I went back and chose a different one that suited me better. I also played around with the different levels and hue adjustments until I was happy that the sunflower was light enough, but still showing some yellow.
As this is the very first time that I am writing a tutorial for others to follow, there is a chance that I may have missed a step or described something not quite clearly – so forgive this beginner.
If you do get stuck, please post your problem, and if I cannot help there are many others who will be able to.
I look forward to seeing your creations!
Welcome to Photoshop Elements & More and to the very first Creative Effects Challenge.
For this challenge we will be creating a grungy flower piece of digital art. I found this tutorial in a UK magazine called “Digital Photo”. I have adapted their steps slightly and so have re-written the tutorial accordingly.
Here is my starting image:

And this is what it looks like afterwards:

I used Photoshop Elements 13 to create the above, so if you are using an older version some of these steps may be slightly different. If you get stuck, let us know and we will try and work it out together.
1. Start by finding a nice textured background, this will become the background for the flower.
2. Next find a photo of a flower shot front on, as this works best.
3. Open both files in PSE.
4. Go to the photo bin and select the flower photo.
5. Let’s start by just selection the flower. For this select the Quick Selection tool by hitting “A” on your keyboard. Make sure the “Add to Selection” option is selected, set the brush size to about 50 pixels and check the “Auto-Enhance” option.
6. Now select the flower by “painting” it. You should see some “marching ants”, showing you what has been selected. Don’t worry if you have accidentally selected more than you wanted to; just switch to “Subtract from Selection” and move to the sections you want to remove from your selection.
7. Once you have selected your flower it is time to copy and paste it onto the textured background. With the flower selected press Ctrl + C to copy your selection and then open the background file and press Ctrl + V to paste the selection onto the background. You should now have the flower on your background; you might need to resize your flower. To do this you use the Free Transform tool by pressing Ctrl + T, grab the corner handles and resize until your flower sits central on your background.
8. Now add a Levels layer to the top of your layer stack and turn it into a Clipping Mask by setting your cursor between the Levels layer and your flower layer and then click Alt which will turn your cursor into a little box with a downwards arrow and now right click with your mouse. This should then result in the Levels layer being clipped to the flower layer underneath.
9. Repeat this step by adding a Hue/Saturation layer in the same manner, and clipping it to the Levels layer.
10. Make the Levels layer active by selection it, click on the levels and adjust the levels until the flower is much lighter. Start by using these values and see how it looks: 0, 1.54 and 255.
11. Next, select the Hue/Saturation Layer, click on the Channel drop down box, select the main colour of your flower and then play around with the sliders until you are happy with the colour. You may need to go to a few colour channels to get an effect you are happy with. I desaturated the yellow, cyan, and magenta in my photo and played around a little with the lightness slider. There is no right or wrong here, this is totally up to your personal taste.
12. Next we want to darken the edges of the flower petals. First, select the top three layers, which should be Hue/Saturation layer, Levels layer, and your flower layer. Then merge them by pressing Ctrl + E on your keyboard.
13. Now repeat step 7 to create a clipped Levels layer. Set the levels to 0, 0.63 and 255, select the Brush tool by pressing “B” on your keyboard. In the tools option section select a soft-edged brush, set the foreground colour to Black by pressing “D” on your keyboard, and depending on the size of your flower petals you might need to adjust the brush size. You are ready to paint over the ends of the petals, giving them a darker look.
14. Find a good grungy texture, open it in PSE and drag it from the photo bin onto your flower. Again, you may need to use the Free Transform tool (Ctrl +T) to ensure that this texture sits over your current creation.
15. Select the Rectangle Marquee tool (“M” on your keyboard) and draw a square selection over this texture. Now we are going to add a layer mask. Go to Layer >Layer Mask>Reveal Selection. Change the blending mode of this layer, try the different options to see which appeals to you the most, and then set the Opacity of this to around 50% (again, it is worth playing around with this).
16. Go back to your Brush tool (“B”) and select a swirly type brush, or anything else that you think will work with your colours and flower you have chosen. I went for a spikey swirl type brush. In the tools option set the brush size and “stamp” over your photo. Adjust the brush size, the brush angle and opacity to get a good variety going.
17. Once you are happy with what you have created flatten the image, crop it to suit your taste; I went for a square crop and then I added a black border.
18. You can stop here or carry on as I did by placing this creation onto another background, cropped to size and then adding one further frame.
The most important part of this tutorial is to experiment. The first texture I used didn’t really work for me, so I went back and chose a different one that suited me better. I also played around with the different levels and hue adjustments until I was happy that the sunflower was light enough, but still showing some yellow.
As this is the very first time that I am writing a tutorial for others to follow, there is a chance that I may have missed a step or described something not quite clearly – so forgive this beginner.
If you do get stuck, please post your problem, and if I cannot help there are many others who will be able to.
I look forward to seeing your creations!


